Enterprise structure is the organization structure as represented in SAP system. Enterprise structure is the basis for the configuration of other parameters. It’s primarily defined with three primary domain areas and is very similar to the finance organization structure used in an organization or sales organization structure used in SAP.
- Finance & Controlling
- Sales and Distribution
- Logistics
Finance and controlling
Following are the elements of FICO related Enterprise structure
- Operating Concern
- Controlling area
- Company code
- Credit control area
Sales and Distribution
SD related enterprise structure defined under the company code is.
- Sales organization
- Distribution channel
- Division
- Sales offices
- Sales group
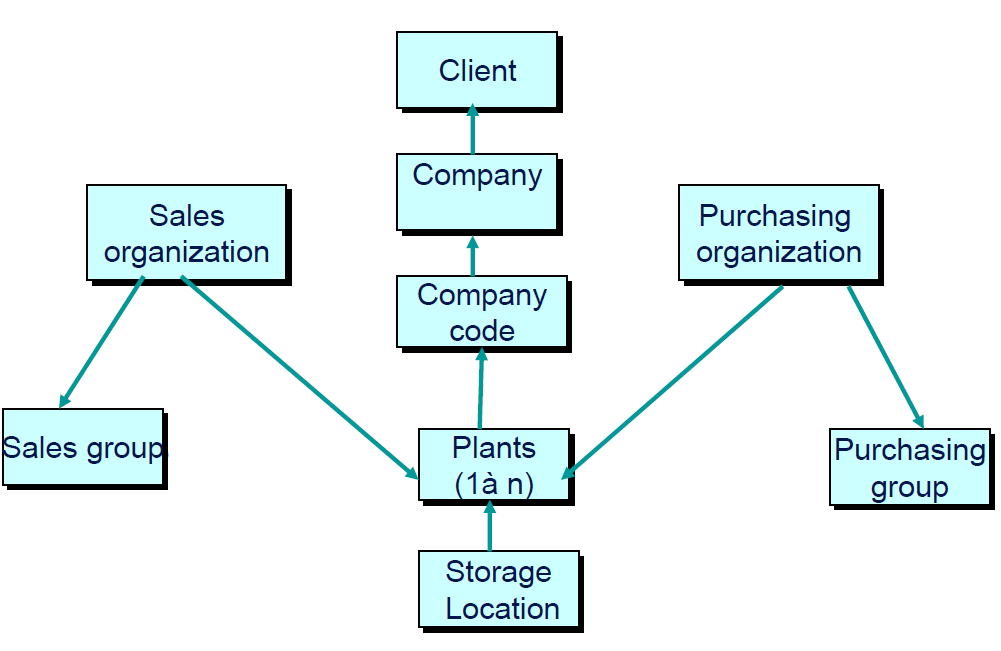
Logistics

Logistics related enterprise structure defined under the company code are
- Plants – Plant describes the place where the production activities are performed or goods and services are provided. It is attached to the company code.
- Storage locations – It represents the physical area within a plant where the materials are stored. It is attached to a plant.
- Purchase organizations – It is responsible for procuring material and services, negotiation of price with the vendor. It can be assigned to company code to make it company specific or assigned to plant to make it plant specific
- Purchasing group – Represents a buyer or group of buyer responsible for certain purchasing activities.
Financial Organisation Structure
Organization unit is the highest level in the ERP system hierarchy. Specifications or data which shall be valid for all ERP organizational units in all applications are entered at the client level, eliminating the need to enter this information more than once (e.g. exchange rates). Each client is a self-contained unit which has separate master records and a complete set of tables and data. Users must enter a client key and have a user master record in the client in order to log on to the system.
Controlling Area

The controlling area identifies a selfâ€contained organizational structure for which costs and revenues can be managed and allocated. It represents a separate unit of cost accounting. One or more company codes can be assigned to a controlling area, which enables you to carry out crossâ€company code cost accounting between the assigned company codes. However, this is only possible if the assigned company codes and the controlling area all use the same operating chart of accounts.
Company Code

A company code is an independent accounting entity (the smallest organizational element for which a completely self-contained set of accounts can be drawn up). An example is a company within a corporate group. It has a unique, four character key. The general ledger is kept at the company code level and is used to create the legally required balance sheets and profit and loss statements.
- A company code designation is required for every financially based transaction entered into R/3. This is done either manually or automatically by deriving the company code from other data elements.
- Company code is assigned to a chart of accounts (COA) which can be used by multiple companies provided they have the same basic account requirements
Chart of Accounts
The chart of accounts is a variant which contains the structure and the basic information about general ledger accounts.
- You define the chart of accounts with a 4 character identifier.
- You define the components of the chart of account, e.g. language, length of the G/L account number.
- The length of the G/L account number can be from 1 to 10 digits.
- The chart of accounts has to be assigned to every company code which would like to create accounts based on the defined structure.
Cost Controlling Objects
The controlling area contains CO objects that take on various functions within Controlling.
such as:
- Internal orders
- Cost objects
- Networks
- Projects
- Cost centers
Fiscal Year
All company codes must be assigned to a fiscal year period.
Creating a Sales Organisation Structure
This is the highest level of the hierarchy and is, therefore, set up first. The company example used here has just one sales organization. Once this sales organization is defined, it can then be assigned to the company code. The different ways products are marketed are then configured by defining the various distribution channels. Once these distribution channels are defined, they are then assigned to the appropriate sales organization. Groupings of materials, referred to as divisions, are then created. These divisions (grouping of materials) are then linked to the sales organization. After the three areas (sales organization, distribution channel, and division) are linked, a sales area is created. Now that the entire sales area is formed, it can be used in the crucial pricing decisions made later.
Creating a Sales Organization
From the IMG Screen: Enterprise structure -> Definition -> Sales and Distribution -> Define, Copy, Delete, Check Sales Organization
Start by double-clicking the Define sales organization line or selecting it and clicking Choose. At the next screen, click the New entries button.
Enter the following:
- Sales Organization: SO_ _
- Description of Sales Organization Name
- Address text name ADDRESS_SENDER
- Letter header text: ADDRESS_HEADER
- Footer lines text: ADDRESS_FOOTER
- Greeting text name: ADDRESS_SIGN
- Sales Org. calendar: US
- Rebate proc. Active: Make sure this box is checked
Click the Address button or hit Shift+F5, on this screen enter the following:
- Postal Code/City: 86011, Flagstaff (Sales Organization zip code and city)
- Country/Region: US, AZ (Country and State)
- Language: English
Click Save, then click Enter.
Assigning New Sales Organization to Company Code
From the IMG Screen: Enterprise structure -> Assignment -> Sales and Distribution -> Assign Sales Organization to Company Code
From the initial screen, scroll down if necessary and double click your company code. One the screen that appears, check the unassigned sales organization(s) for your company, then click enter.

Review all new assignments then click Save. The above screen shows the assignment. Your sales organization has now been assigned to your company code.
Definition of Distribution Channels
From the IMG Screen: Enterprise structure -> Definition -> Sales and distribution -> Define, Copy, Delete, Check Distribution Channel
Double click Define distribution channel or select the line and click Choose. Click the New entries button, then enter your distribution channels as shown:
Distr. Channel-Name
- DI- Direct
- WH-Wholesale
- RE-Retail
Click Save to record the new definitions, review entries.
Linking Sales Organization to Distribution Channels
From the IMG Screen: Enterprise structure -> Assignment -> Sales and distribution -> Assign distribution channel to sales organization
At this screen, find the sales organization you created and assigned to your company code. Double click your sales organization or select that line and click Assign, this will bring up a screen listing all of the distribution channels that are available to your sales organization. This list should include the channels that were just set up and any that existed in the system previously.

Check the channels that were created in the section above: DI, WH, and RE. Now click Enter. Once you have returned to the first screen, scroll up and review the assignments just made. Click Save before exiting to record the assignment changes.
Defining Divisions
From the IMG Screen: Enterprise structure -> Definition -> Logistics general -> Define, Copy, Delete, Check Division
Double-click Define Division, or select the line then click the Choose button. On the very next screen, click the New entries button. On this screen, create your new divisions, then click Save.

Assigning Divisions to Sales Organizations
From the IMG Screen: Enterprise structure -> Assignment -> Sales and distribution -> Assign division to sales organization
From this screen, double-click your sales organization, or select it and click the Assign button. Check the relevant divisions created in the previous step to accept, then click enter. Scroll up to review the assignments, they should look similar to the following screen, now click Save to keep new assignments.

Setting up the Sales Areas
From the IMG Screen: Enterprise structure -> Assignment -> Sales and distribution -> Set up sales area
From this screen, double-click your sales organization, or select it and click the Assign button. Select the distribution channels individually, then select the sales area that needs to be assigned to that distribution channel. Review the entries, they should look similar to those set up to the right. Click Save once all the selections and assignments have been made.


Leave a Reply